a pair of fingernail clippers.
Rinse the bottle thoroughly to remove any traces of bleach.
Start by cutting out the center section of the Clorox™ bottle--just remove the upper part and the bottom. You will have a cylinder about 4 inches tall. Examine the cylinder carefully, and you will see that there are two vertical seams that are on opposite sides of the cylinder. These are the places where the bottle mold fits together. Cut along one of the seams. You will end up with a strip of white plastic about 4 inches high by 19 1/2 inches long.
Before continuing, wipe the inside surface of the plastic strip with paper toweling to make certain all the bleach is gone and that the plastic is dry.
Place the plastic strip on the hard flat surface, with the (former) inside of the bottle down. The long dimension of the plastic should run from left to right, just as if you had flattened collar out on the table in front of you. Tape the ends of the plastic to your work surface. Now start to lay out the ends of the collar.
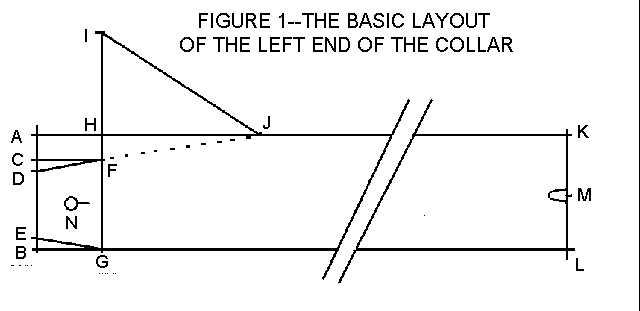
The drawing shows the left end of the collar and the left half of the collar button hole. The right half of the collar is a mirror image of the left half. The line from K to L is the center line of the collar. This will be the other seam line, and it should be visible to you on the piece of plastic on your work surface. If it is not visible, measure to the center of the piece of plastic and draw a center line.
To get the overall length of the plastic collar, measure the distance from one of the collar stud holes in the collar of your favorite shirt to the other collar stud hole. then add 1 1/2 inches. This gives you the amount of play you need in the collar to be able to fasten it without discomfort. Take that total measurement and divide it by 2 and that will be the distance from A to K and B to L.
You will now lay out those lines. These are very important, because they determine the size and shape of the collar. At the lower edge of the piece of plastic, just where the surface becomes reasonably flat, take a long piece of masking tape and run it along the length of the plastic, so the lower edge of the tape forms the line that goes from B to L (and actually over to the other end of the collar. Make a mark 1 1/4 inches above the lower edge of the piece of masking tape on each end of the piece of plastic, and run another long piece of masking tape along the length of the plastic, connecting those two marks. This time, the upper edge of the tape will form the line. These two pieces of tape give you the height of the collar--1 1/4 inches.
At this point, mark the length of the collar by using the length you arrived at when you added 1 1/2 inches to the distance from one collar stud hole to the other. Measure half that distance on each side of the center line--the center line itself on the surface of the bottle may not be exactly centered. Once you have the total length of the collar, it is time to do the details of the "wings" of the collar.
I'll show you how to lay out the left end of the collar. Just do the same thing as a mirror image on the right end and everything will work out fine.
Point H is 3/4 inch from point A. Point G is 3/4 inch from point B. Make those marks with pencil. Point C is 1/4 inch from A and point F is 1/4 inch from H. Mark those points also. Point D is 1/8 inch from point C. Point E is 1/8 inch above point B. Mark those points, and draw a line from point E to G and from D to F.
Point I is 1 1/2 inch above point F. Point J is 2 3/16 inches from point I. Mark those points, and draw lines from F to I and from I to J. IMPORTANT--I to H is perpendicular to the top of the collar.
Duplicate all of these lines--mirror fashion--at the right end of the collar.
Finally, before you do any cutting, make marks at M and N. The mark at M should be the same distance from L as the center of your back collar button from the bottom edge of your shirt collar--on my shirts, this is 5/8 inch. Mark N should be 1/2 inch above line B-G and 3/8 inch from line A-B.
The completed layout should look like the following drawing:
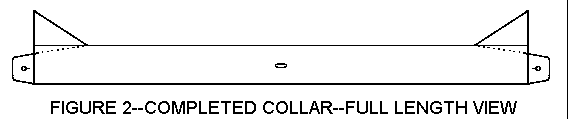
Now cut the collar out as follows. Cut the bottom of the collar by cutting along the lower edge of the entire length of the first piece of masking tape you placed on the plastic. Cut from A to B. Cut from B to G. Cut from I to F. Cut from D to F. Cut from I to J. Then cut the top edge of the collar, from mark J on the left end to mark J on the right end. Be sure to cut both of the ends before trying to cut the top edge of the collar.
Now, using the leather punch--punch holes about 1/8 inch in diameter at mark N, and cut a fine line--about 1/4 inch long from the edge of the hole toward the center line of the collar. This allows the stud to pass into the hole without damaging anything. Using the leather punch, make an oval hole at M, about 1/8 inch high and 3/8 inch long. This is necessary to allow the button to pass through the hole. Punch along the length of the hole and smooth with the craft knife.
Round the corners at D and E with your fingernail clippers.
For the finishing touch, fold the wings toward you on line F-J (the dotted line).
The masking tape will come off easily, and any residue of adhesive from the old label of the bottle will scratch off with a fingernail.
You now have a durable plastic collar that costs nothing other than the cost of the masking tape--that's a hard price to beat!
You can, of course, make other collar styles. This one is the easiest, though.
Other measurements--the distance between the two end buttonholes should be equal to the distance between the buttonholes at the front of the collar of the shirt plus about 1/2 inch.
To make the collar higher, add equal amounts to the lines at F-H and M-K.
The points of the collar may also be made larger or may be rounded. Whatever you do to one end of the collar must be reproduced as a mirror image on the other end.
These collars may be cleaned with ordinary soap and water.
To return to Three Eyed Willy's costume page, click here.
To return to Three Eyed Willy's main Cowboy Action Shooting® Page, click here.
To contact Three Eyed Willy, click here.
© 1999 Bill Palmer. To reproduce this page contact Bill Palmer.
Start by cutting out the center section of the Clorox™ bottle--just remove the upper part and the bottom. You will have a cylinder about 4 inches tall. Examine the cylinder carefully, and you will see that there are two vertical seams that are on opposite sides of the cylinder. These are the places where the bottle mold fits together. Cut along one of the seams. You will end up with a strip of white plastic about 4 inches high by 19 1/2 inches long.
Before continuing, wipe the inside surface of the plastic strip with paper toweling to make certain all the bleach is gone and that the plastic is dry.
Place the plastic strip on the hard flat surface, with the (former) inside of the bottle down. The long dimension of the plastic should run from left to right, just as if you had flattened collar out on the table in front of you. Tape the ends of the plastic to your work surface. Now start to lay out the ends of the collar.
The drawing shows the left end of the collar and the left half of the collar button hole. The right half of the collar is a mirror image of the left half. The line from K to L is the center line of the collar. This will be the other seam line, and it should be visible to you on the piece of plastic on your work surface. If it is not visible, measure to the center of the piece of plastic and draw a center line.
To get the overall length of the plastic collar, measure the distance from one of the collar stud holes in the collar of your favorite shirt to the other collar stud hole. then add 1 1/2 inches. This gives you the amount of play you need in the collar to be able to fasten it without discomfort. Take that total measurement and divide it by 2 and that will be the distance from A to K and B to L.
You will now lay out those lines. These are very important, because they determine the size and shape of the collar. At the lower edge of the piece of plastic, just where the surface becomes reasonably flat, take a long piece of masking tape and run it along the length of the plastic, so the lower edge of the tape forms the line that goes from B to L (and actually over to the other end of the collar. Make a mark 1 1/4 inches above the lower edge of the piece of masking tape on each end of the piece of plastic, and run another long piece of masking tape along the length of the plastic, connecting those two marks. This time, the upper edge of the tape will form the line. These two pieces of tape give you the height of the collar--1 1/4 inches.
At this point, mark the length of the collar by using the length you arrived at when you added 1 1/2 inches to the distance from one collar stud hole to the other. Measure half that distance on each side of the center line--the center line itself on the surface of the bottle may not be exactly centered. Once you have the total length of the collar, it is time to do the details of the "wings" of the collar.
I'll show you how to lay out the left end of the collar. Just do the same thing as a mirror image on the right end and everything will work out fine.
Point H is 3/4 inch from point A. Point G is 3/4 inch from point B. Make those marks with pencil. Point C is 1/4 inch from A and point F is 1/4 inch from H. Mark those points also. Point D is 1/8 inch from point C. Point E is 1/8 inch above point B. Mark those points, and draw a line from point E to G and from D to F.
Point I is 1 1/2 inch above point F. Point J is 2 3/16 inches from point I. Mark those points, and draw lines from F to I and from I to J. IMPORTANT--I to H is perpendicular to the top of the collar.
Duplicate all of these lines--mirror fashion--at the right end of the collar.
Finally, before you do any cutting, make marks at M and N. The mark at M should be the same distance from L as the center of your back collar button from the bottom edge of your shirt collar--on my shirts, this is 5/8 inch. Mark N should be 1/2 inch above line B-G and 3/8 inch from line A-B.
The completed layout should look like the following drawing:
Now cut the collar out as follows. Cut the bottom of the collar by cutting along the lower edge of the entire length of the first piece of masking tape you placed on the plastic. Cut from A to B. Cut from B to G. Cut from I to F. Cut from D to F. Cut from I to J. Then cut the top edge of the collar, from mark J on the left end to mark J on the right end. Be sure to cut both of the ends before trying to cut the top edge of the collar.
Now, using the leather punch--punch holes about 1/8 inch in diameter at mark N, and cut a fine line--about 1/4 inch long from the edge of the hole toward the center line of the collar. This allows the stud to pass into the hole without damaging anything. Using the leather punch, make an oval hole at M, about 1/8 inch high and 3/8 inch long. This is necessary to allow the button to pass through the hole. Punch along the length of the hole and smooth with the craft knife.
Round the corners at D and E with your fingernail clippers.
For the finishing touch, fold the wings toward you on line F-J (the dotted line).
The masking tape will come off easily, and any residue of adhesive from the old label of the bottle will scratch off with a fingernail.
You now have a durable plastic collar that costs nothing other than the cost of the masking tape--that's a hard price to beat!
You can, of course, make other collar styles. This one is the easiest, though.
Other measurements--the distance between the two end buttonholes should be equal to the distance between the buttonholes at the front of the collar of the shirt plus about 1/2 inch.
To make the collar higher, add equal amounts to the lines at F-H and M-K.
The points of the collar may also be made larger or may be rounded. Whatever you do to one end of the collar must be reproduced as a mirror image on the other end.
These collars may be cleaned with ordinary soap and water.
To return to Three Eyed Willy's costume page, click here.
To return to Three Eyed Willy's main Cowboy Action Shooting® Page, click here.
To contact Three Eyed Willy, click here.
© 1999 Bill Palmer. To reproduce this page contact Bill Palmer.
Now, using the leather punch--punch holes about 1/8 inch in diameter at mark N, and cut a fine line--about 1/4 inch long from the edge of the hole toward the center line of the collar. This allows the stud to pass into the hole without damaging anything. Using the leather punch, make an oval hole at M, about 1/8 inch high and 3/8 inch long. This is necessary to allow the button to pass through the hole. Punch along the length of the hole and smooth with the craft knife.
Round the corners at D and E with your fingernail clippers.
For the finishing touch, fold the wings toward you on line F-J (the dotted line).
The masking tape will come off easily, and any residue of adhesive from the old label of the bottle will scratch off with a fingernail.
You now have a durable plastic collar that costs nothing other than the cost of the masking tape--that's a hard price to beat!
You can, of course, make other collar styles. This one is the easiest, though.
Other measurements--the distance between the two end buttonholes should be equal to the distance between the buttonholes at the front of the collar of the shirt plus about 1/2 inch.
To make the collar higher, add equal amounts to the lines at F-H and M-K.
The points of the collar may also be made larger or may be rounded. Whatever you do to one end of the collar must be reproduced as a mirror image on the other end.
These collars may be cleaned with ordinary soap and water.
To return to Three Eyed Willy's main Cowboy Action Shooting® Page, click here.
To contact Three Eyed Willy, click here.